Did you know that more than 75 percent of whisky fans admit their appreciation grows when they follow a professional tasting process? Setting up for a whisky tasting does more than fill your glass—it turns every sip into an opportunity to discover new flavors and aromas. Whether you are just starting out or want to refine your palate, the right preparation and tasting steps can reveal layers and stories hidden in every bottle.
Table of Contents
- Step 1: Prepare Your Tasting Space And Tools
- Step 2: Select Whisky Types And Pour Samples
- Step 3: Observe Appearance And Aroma Characteristics
- Step 4: Taste And Assess Flavour Profiles
- Step 5: Evaluate Finishes And Compare Overall Impressions
Quick Summary
| Key Point | Explanation |
|---|---|
| 1. Use Glencairn glassware | This glass optimizes aroma concentration, enhancing your whisky tasting experience. |
| 2. Prepare a clean workspace | A tidy environment with proper lighting helps assess colour and clarity accurately. |
| 3. Select diverse whisky types | Choose an array of whiskies to explore different flavor profiles and enhance appreciation. |
| 4. Observe whisky appearance | Examine colour against a white background to glean insights on age and maturation. |
| 5. Evaluate finish quality | Pay attention to lingering flavors post-tasting, as they reveal complexity and balance. |
Step 1: Prepare your tasting space and tools
Turning a simple whisky tasting into an extraordinary sensory journey starts with setting up the right environment and selecting precise tools. Your preparation will transform an ordinary moment into a professional whisky exploration.
First up, select the right glassware. According to First Phil Whisky, a Glencairn glass provides the optimal whisky tasting experience by concentrating aromas effectively. These specially designed glasses have a unique tulip shape that channels complex scents directly to your nose while allowing enough room for subtle fragrance development.
Prepare a clean workspace with good lighting where you can observe the whisky’s colour and clarity. White backgrounds work best for colour assessment. Gather essential tools like a water jug with distilled water (used for slightly diluting whisky to open up flavours), a small notebook for tasting notes, and clean water for palate cleansing between samples.
Here’s a summary of essential whisky tasting tools and their purposes:
| Tool | Purpose |
|---|---|
| Glencairn glass | Concentrates aromas, ideal for nosing |
| White background | Accurate colour assessment |
| Distilled water jug | Dilutes whisky to unlock flavours |
| Clean water | Cleanses palate between samples |
| Notebook | Records tasting notes and impressions |
Pro Tip: Keep your tasting area free from strong competing aromas like cooking smells, perfumes, or candles that might interfere with the whisky’s delicate scent profile.
When you’re ready to start, ensure your glassware is spotlessly clean and at room temperature. Residual soap or fingerprints can dramatically impact your tasting experience. Minimal preparation now means maximum enjoyment later.
With your space and tools ready, you’re perfectly positioned to begin your whisky tasting adventure. Your next step will be selecting and pouring your whisky samples.
Step 2: Select whisky types and pour samples
Now that your tasting space is ready, it is time to curate an engaging whisky lineup that will take your sensory exploration to the next level. According to The Malts, selecting a variety of whiskies that showcase different styles is key to appreciating the incredible diversity of flavor profiles.
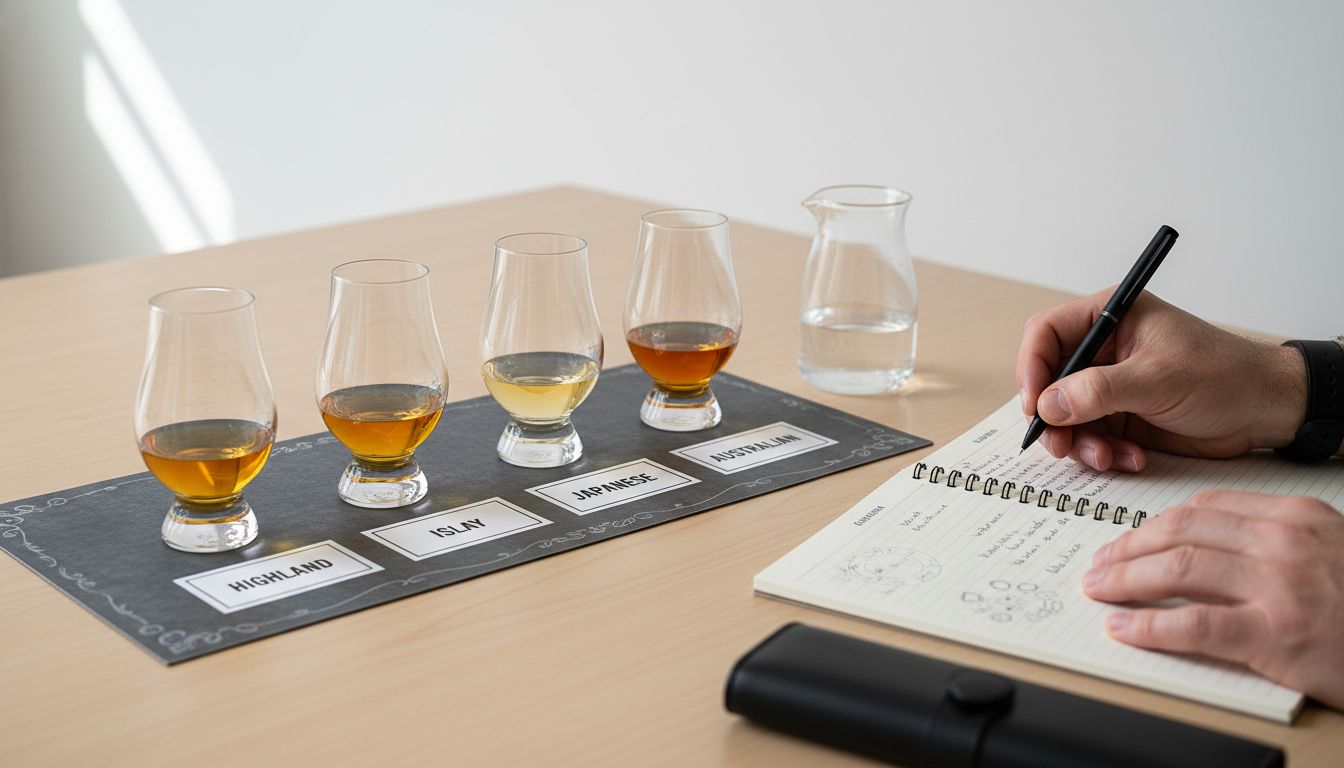
Start by choosing whiskies from varied categories like single malts, blended whiskies, and expressions from different regions. This approach will help you understand the nuanced characteristics that make each whisky unique. Consider including a Scottish Highland single malt, an Islay peated whisky, a Japanese single malt, and perhaps an Australian craft whisky to create a comprehensive tasting experience.
As recommended by First Phil Whisky, pour small and equal samples into your prepared Glencairn glasses. The goal is to have enough liquid to swirl gently and release aromas without risking spillage. Aim for approximately 15 to 20 millilitres per sample.
Pro Tip: Always pour your samples in the same order you plan to taste them, typically moving from lighter to more intense flavour profiles.
Arrange your glasses in a logical sequence that allows you to appreciate the progression of flavors.
 This methodical approach will help you detect subtle differences and build a comprehensive understanding of each whisky’s unique character.
Learn more in our comprehensive guide on essential whisky types, which will provide additional insights into selecting the perfect whisky lineup for your tasting adventure. With your samples poured and prepared, you are now ready to begin the most exciting part of your whisky exploration.
Step 3: Observe appearance and aroma characteristics
With your whisky samples carefully poured, you are about to embark on the most nuanced part of whisky tasting where visual and olfactory exploration reveals deep insights into each spirit. According to London Cask Traders, the visual examination of whisky provides critical information about its age and maturation process.
Begin by holding your glass against a white background to assess the whisky’s true color. Look for subtle variations ranging from pale straw to deep amber or rich mahogany. These hues tell a story about the whisky’s journey from cask to glass. Lighter colors might suggest younger whiskies or those aged in bourbon casks, while deeper golden or reddish tones often indicate longer aging or sherry cask influences.
As recommended by Glenfiddich, the aroma exploration requires a delicate technique. Gently tilt your glass and take short sniffs with your mouth slightly open. This approach allows complex aromatic molecules to reach your olfactory receptors without overwhelming them.
Pro Tip: Move the glass slowly around your nose, noting how aromas change and evolve as the whisky interacts with air.
Initially detect immediate scents like fruits, vanilla, or spices. Then pause and return to the glass to discover more subtle underlying notes. Some whiskies might reveal hints of sea salt, smoke, honey, or leather with patient observation.
Explore our comprehensive guide on whisky types to understand how different regions and production methods influence these fascinating sensory characteristics. Your meticulous observation sets the stage for the next exciting step in your whisky tasting journey.
Step 4: Taste and assess flavour profiles
With your visual and aromatic exploration complete, you are now ready to dive into the most anticipated stage of whisky tasting discovering the intricate flavour landscape. According to Diageo Bar Academy, the key to understanding whisky is to take a small sip and allow it to thoroughly coat your mouth.
Begin by taking a modest sip approximately 5 millilitres and let the liquid slowly move across different areas of your tongue. Pay attention to the primary flavor profiles sweet, sour, salty, bitter, and umami. Notice how these tastes interact and balance each other. Some whiskies might start sweet with a hint of honey or caramel, then transition to spicier notes of black pepper or cinnamon, finishing with a subtle smoky or woody undertone.
As recommended by The Malts, consider adding a few drops of water to your whisky. This simple technique can dramatically transform the flavor profile, especially in higher proof expressions. Water helps to open up additional layers of complexity, releasing aromas and softening the alcohol burn.
Pro Tip: Add water incrementally one drop at a time to find the perfect dilution that reveals the whisky’s hidden nuances.
Take your time with each sample. Allow the whisky to rest on your palate for several seconds, breathing gently through your mouth to enhance flavor perception. Notice how the taste evolves from the initial impression to the mid palate and finally the finish.
Explore our comprehensive guide on whisky types to deepen your understanding of how regional variations and production methods influence these remarkable flavor profiles. Your palate is now ready to embark on a sensory journey of discovery.
Step 5: Evaluate finishes and compare overall impressions
As you approach the final stage of your whisky tasting journey, you will transform from a casual sipper to a discerning evaluator. According to Glenfiddich, the finish represents the whisky’s lasting impression the lingering flavors and sensations that dance on your palate after swallowing.
Pay close attention to how long the flavors persist. A remarkable whisky will offer a finish that evolves and reveals new dimensions even after the liquid has disappeared. Short finishes might suggest younger or less complex spirits, while longer finishes often indicate more mature and carefully crafted whiskies. Notice whether the finish is sharp and immediate or gradually unfolds like a subtle narrative.
As recommended by First Phil Whisky, your comparison should extend beyond individual characteristics. Consider the overall balance and complexity of each whisky. Look for harmony between initial taste, mid palate sensations, and the final finish. Some whiskies might surprise you by presenting completely unexpected flavor transformations during this evaluation stage.
Pro Tip: Clean your palate with plain water or unsalted crackers between tastings to ensure each whisky receives a fair assessment.
Rank your whiskies based on multiple dimensions like aroma complexity, flavor depth, balance, and personal enjoyment. Remember that preference is subjective your perfect whisky might differ dramatically from another taster’s ideal spirit.
Explore our comprehensive guide on whisky types to understand the nuanced world behind these fascinating flavor profiles. Your tasting journey has transformed you from a curious novice to an informed whisky appreciator.
Elevate Your Whisky Tasting Experience with Uisuki
Mastering how to compare whisky types requires more than just following a tasting guide it calls for access to exceptional whiskies that showcase diverse flavours and regions. If you are ready to move beyond learning and start exploring the rich variety of single malts, blended whiskies and exclusive releases then Uisuki offers exactly what you need. Discover whiskies from Scotland to Japan and Australia, each carefully selected to help you experience those subtle aroma shifts and flavour profiles described in the step-by-step guide.
Unlock your palate’s potential today by browsing our curated collection at Uisuki. With detailed descriptions, ABV details and customer reviews, you can confidently select whiskies that match your tasting goals. Don’t wait to turn your home tasting session into an extraordinary journey. Start exploring whisky diversity now at Uisuki and bring the expert guidance from the article to life in your glass.
Frequently Asked Questions
How do I set up my whisky tasting space?
To set up your whisky tasting space, choose a clean area with good lighting and a white background for accurate color assessment. Gather essential tools such as Glencairn glasses, distilled water, clean water for palate cleansing, and a notebook for tasting notes.
What types of whisky should I include in my tasting lineup?
Include a variety of whisky types to enhance your tasting experience. Consider selecting single malts, blended whiskies, and expressions from different styles to showcase unique flavor profiles, such as a Scottish Highland single malt and an Islay peated whisky.
How should I pour whisky samples for tasting?
Pour small, equal samples of approximately 15 to 20 millilitres into your prepared Glencairn glasses. Pour in the same order you plan to taste them, moving from lighter to more intense flavors for a better comparative experience.
What should I observe during the whisky’s appearance and aroma assessment?
Observe the whisky’s color against a white background to gain insight into its age and maturation process. Then gently sniff the whisky, allowing complex aromas to reach your nose; take note of immediate scents and subtle underlying notes.
How can I assess the flavor profiles of different whiskies?
Take a small sip of each whisky and let it coat your mouth while paying attention to the primary taste profiles, such as sweet, sour, and bitter. Allow the whisky to rest on your palate for a few moments while analyzing how the flavors evolve from initial taste to finish.
What factors should I consider when evaluating whisky finishes?
Evaluate the length of the finish and how flavors persist after swallowing. Look for harmony and complexity in the overall experience, taking notes on how each whisky’s tastes interact and balance over time.